
Fossils in amber (Part 2): Preparation and study

Dr David Penney and Dr David Green (UK)
This is the second in a series of articles concerning fossils in amber. In the first, we focused on the biodiversity of organisms in the major deposits of the world, including the techniques available for distinguishing genuine fossils from fakes (see Fossils in amber (Part 1): Biodiversity). When the first fossil amber specimens were examined back in the 1600s, only very basic microscopy was available to examine the inclusions. In recent years, great progress has been made in amber preparation procedures, photomicroscopy and advanced imaging techniques, which can all now be employed in the study of fossils in amber.
Optical properties of amber
To understand the rationale for the preparation techniques described below, it is worth reviewing the way light passes through amber and the way that images are formed. Amber is usually transparent or translucent. The more transparent it is, the less the light is absorbed as it travels through the specimen. As opacity increases, more light is absorbed and inclusions become more difficult to see. Arthropod inclusions are visible because they have differing opacities and refractive indices to the enclosing amber.
When light rays cross boundaries between media with different refractive indices (such as amber and air) they bend. If the surface is flat and polished, the light rays bend in a predictable manner and it is easy to see what lies within. If a surface is curved, irregular, undulating or scratched, the light rays bend in different directions, depending on where they come out, and the image is distorted. For maximum visibility, a specimen should be prepared with a flat, optically polished surface in the minimum depth of amber. A minimum depth is important, as variations in refractive index in the body of the amber produce optical distortions. Flaws, dust and other foreign bodies between an inclusion and the specimen surface scatter the light, reduce contrast and also make the inclusion more difficult to see.
Many collectors and curators value large, intact amber specimens and it is not always possible, or even desirable, to cut and polish a specimen. Fortunately, there is a simple technique that can eliminate the distortions produced by a curved, irregular or scratched surface. Immersing a specimen in a fluid with a similar refractive index to amber dramatically increases its visibility. This technique reduces light scattering at the surface and eliminates the distortions produced by irregularities and curvature.
Preparation of amber inclusions
Once raw amber has been washed and cleaned, it is often possible to determine whether or not it contains inclusions by coating it with a thin smear of oil and holding it up to the light. The oil fills scratches and flaws on the surface of the amber, increasing the visibility of any inclusions that are present. If this is not practical, for example, due to the external surface being particularly crusty, a ‘window’ is ground and polished into the specimen. When something of interest is discovered, further preparation is usually required. This typically involves cutting or grinding, and then polishing the amber. The first of these processes requires a circular trim saw (ideally a faceting saw) with a thin diamond blade. Chipping of the amber is minimized by rotating the specimen during the cutting process. Water is used as a coolant and lubricant to protect the specimen from overheating. For smaller pieces, a fine handheld jeweller’s saw can also be used.
Once it has been trimmed to size, the surface of the amber should be ground to remove saw marks and then polished. Amber is relatively soft and the best results are achieved by careful grinding by hand, or on a flat lap (that is, a large horizontal wheel similar to a record turntable or potter’s wheel), using successively finer grades of good quality abrasive paper. Check the specimen regularly under a microscope to avoid grinding it too much and damaging the inclusion. Saw marks are easily removed using a medium 360-grade paper. Specimen and hands must be cleaned before transfer to 600, 1,200 and 2,500-grades.
At each stage, a careful inspection of the surface is required, as even the tiniest scratches cannot be removed by polishing. A fine napped polishing pad, charged with a one micron diamond compound (14,000 mesh equivalent) or 200nm alumina (which is probably better, but takes a bit longer), can be used to produce a highly polished surface. The polishing compound is made up as a paste in water, which acts as a coolant to protect the amber and its inclusion from overheating. If the surface remains dull after a few minutes of gentle polishing using a figure of eight motion, the specimen should be returned to 600-grade abrasive paper and the process repeated.
When mechanical equipment is used, it is important to follow the safety instructions. The specimen should be rotated during grinding and polishing to get an even finish, because the outside of the lap rotates faster than the inside. With an anti-clockwise spinning wheel, it is easier to manipulate the amber with the wheel turning away from the operator, that is, the amber should be held on the right-hand-side of the wheel. Particular care should be taken to maintain a firm hold of the specimen. Should it slip, a fast-spinning wheel can transport it a great distance in a random direction.
Check the amber carefully for internal fractures. The forces generated during cutting, grinding and polishing can cause specimens to break. In some cases, they may be glued back together. It may then be possible to resume the preparation process without further damage to the specimen. However, this is not always the case.
Special techniques
The clarity of most Tertiary amber, in conjunction with the excellent preservation of the fossil inclusions, means that cutting to an appropriate size, followed by grinding and polishing (Fig. 1) is sufficient for most scientific study. More elaborate techniques, using immersion fluids and embedding media of similar refractive index to amber have been developed by some researchers. Specimens can be immersed in water white oil of cedar wood (or similar) once they have been trimmed to the appropriate size. The refractive index of the oil is very similar to amber, so, using this technique, inclusions can be viewed from multiple angles by rotating the specimen in the oil.

A variation on the above technique is particularly useful for brittle Cretaceous ambers, such as those from Lebanon. It is difficult to extract large specimens as they commonly shatter, so most inclusions are recovered from fragmentary material. The brittle nature and small specimen size makes cutting and grinding the raw amber impractical. Therefore, to prepare inclusions for study, it is best to shave slivers of amber from the specimen using a razor blade, getting as close as possible to the inclusion dorsally and ventrally.
This is then placed in a deep fluid mount, made by gluing a shallow plastic ring to a circular microscope slide cover-slip, which has been filled slowly – so as not to create air bubbles – with Canada balsam. The amber is gently eased into the cell, taking care not generate bubbles, which, if formed, can be removed using a fine needle. Canada balsam has the same refractive index as amber and it seeps into any surface cracks, significantly increasing the clarity. A second cover slip is fixed onto the preparation using plastic cement. Once it has begun to set, the excess cement can be shaved off around the edge to create an aesthetically pleasing finish (Fig. 1).
An innovative modification of the above technique was employed by scientists working on Cretaceous amber from France. The amber was shaved as close to the inclusion as possible, but from all sides rather than just dorsally and ventrally. The specimen was then glued to the blunt end of a thin pin. Four small glass panes were glued to a microscope slide to make a small cell structure. One of the panes had a hole in the centre, through which the pin was inserted with the inclusion on the inside. The pin fitted snugly but was free to rotate. This cell was then filled with Canada balsam and a thin glass pane was glued on top. When the specimen was viewed under the microscope, the pin could be rotated to view it from many different angles.
Brittle ambers can also be mounted in blocks of synthetic transparent plastic (Fig. 1), which is fluid when mixed and solid once set. This can be done to facilitate study as well as to preserve the specimen. This technique makes the amber easier to handle and prevents it from shattering during grinding and polishing. The block can be reset in fresh plastic as many times as desired to polish it from various angles. However, care must be taken to avoid unwanted air bubbles, but these can be minimised by allowing the plastic to set in a vacuum (if possible).
The result is a tiny, inclusion-bearing piece of amber, highly polished on many sides, set in the centre of a hard transparent plastic block. This is a time consuming process, but worth the effort for some specimens. It has the bonus of protecting the amber from accidental damage and oxidation through exposure to air. Hoffeins (2001) provides a short explanation and practical advice for undertaking this embedding process without access to specialised technical equipment. Collectors should find his paper particularly useful. It is important to choose a synthetic plastic that is as hard as the amber. If the plastic is softer, it grinds more quickly than the amber and can pull at the surface causing it to shatter.
Attempts to dissolve Lebanese amber in chloroform to extract the inclusions have been successfully carried out. Articulated insect fragments, which retained their softness in a manner similar to freshly collected entomological material, were recovered. This process may seem absurd to some, as much of the beauty of amber inclusions is in the amber itself. However, to a palaeontologist, the inclusion is more interesting than the surrounding amber matrix and a technique that can separate the two has scientific merit. Indeed, it can be frustrating when museum curators will not permit further preparation of specimens for scientific study simply because of aesthetic concerns. Readers are cautioned that any attempt to dissolve out specimens may lead to loss of both the amber and the inclusion.
Light microscopy and photography
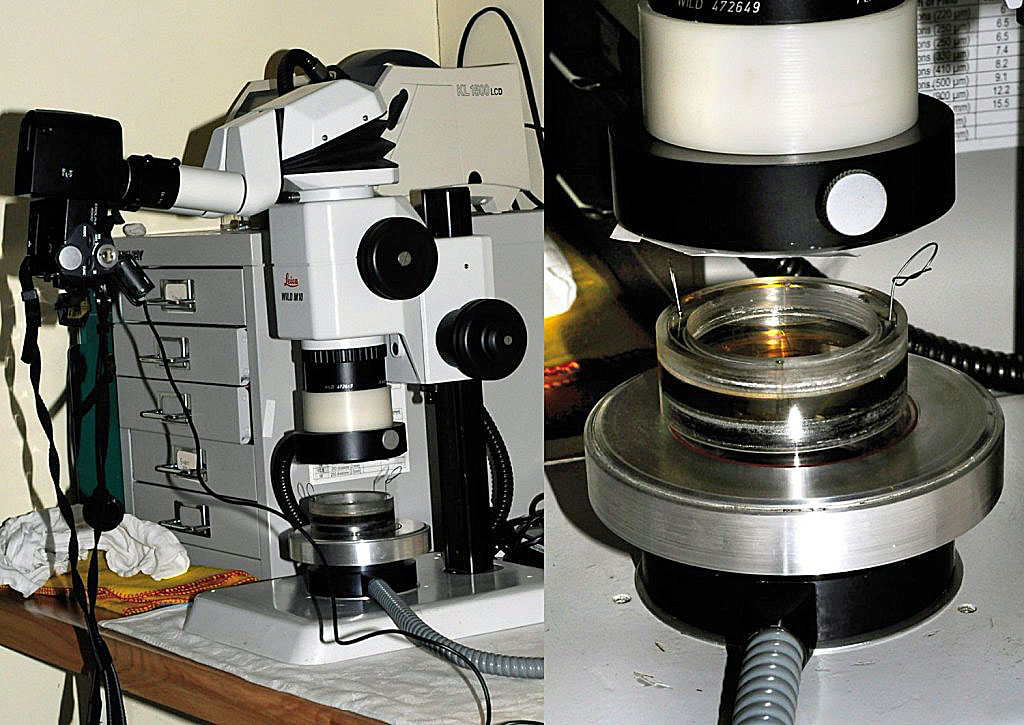
The preparation techniques described above are designed to facilitate detailed study of an inclusion. A simple hand lens may be useful for reconnaissance investigations, but more detailed work requires a stereomicroscope. It is important that the reader understands the difference between a stereomicroscope and compound microscope. The former has a relatively large depth of field, a large working distance and produces an upright, three-dimensional image of the object under investigation. The latter is designed to investigate thinly sliced specimens mounted on microscope slides. It produces a reversed image with almost no depth of field and is of limited use in amber investigations. Compound microscopes are only useful for examining fine details of inclusions in very thin sections of amber and for tiny micro-organisms.
Lighting is important when examining amber inclusions – the more flexible the illumination system, the better. Transmitted (from below) and incident illumination (from above) is required, and the facility to produce dark ground illumination is a considerable advantage. Dark ground illumination produces an image of the object in scattered light and is very useful when examining fine details such as hairs on the legs of insects and spiders. Fibre optic light sources are commonly used to produce directional incident light. Transmitted (and dark ground) systems are usually built into the microscope base. Different specimens require differing combinations of transmitted and incident light (or either on its own) to produce the best results. Different coloured backgrounds (blue, red, black or white) can radically alter the contrast and can have marked effects on the visibility of the inclusion (Fig. 2).

Drawing tubes are available as an optional accessory with a few stereomicroscopes. They enable the researcher to look down the microscope and draw the specimen at the same time. Using a combination of angled mirrors, the user is able to see the tip of a pencil superimposed on the image of the specimen. It is then possible to trace its outline … or so the theory goes. In practice, using a drawing tube requires a degree of practice and correct lighting is important to get the best results. Drawing tubes are only useful when trying to draw ‘flat’ specimens, that is, the specimen must be wholly in focus, because adjusting the focus will produce a misalignment on the drawing.
Most collectors and scientists will need to photograph specimens at some stage. Photography produces a permanent record that can be studied at leisure and may be useful to illustrate an article, add to a database or share with another enthusiast. Ideally, for photography, a specimen should be prepared so that it lies between two polished surfaces in the minimum practical depth of amber. It should also be oriented so that all features of interest are visible.
Collectors and curators value large pieces of amber, which may have multiple inclusions, but cutting, grinding and polishing to separate them are not without danger. It is often not possible or appropriate to prepare a specimen and, therefore, it becomes necessary to use a technique that will produce as good a photograph as possible without damage. The optical distortions produced by irregular surfaces are largely eliminated when amber is immersed in a fluid that has the same refractive index of about 1.54 +/- 0.01 (Fig. 3).

Some distortion is still produced at the fluid surface, but this can be reduced by floating a microscope slide cover glass on it. For fluid photography, the specimen is immersed in a small transparent tank so that it can be illuminated from any direction (Fig. 4). Clear plastic wedges are useful as props so the orientation can be changed. Once the specimen is properly oriented, the illumination (top and bottom) is adjusted to accentuate the features of interest. Different backgrounds are then added to enhance the contrast. Since amber absorbs blue light, a blue background is often the most useful.
The three-dimensional nature of amber inclusions can cause problems if the thickness of the specimen exceeds the depth of field of the image. A typical zoom stereomicroscope has a depth of field varying between a few tens to a few hundred micrometres, depending on the magnification. Many amber inclusions are thicker than this, so they do not appear to be wholly in focus on any single photograph.
However, recent advances in image processing have overcome this problem and it is now possible to take numerous digital images, focusing slightly further down the specimen each time to produce a stack. Software that combines the in-focus parts of each image in the stack is then used to produce a single image with everything in focus (Haug et al, 2009) (Fig. 5). Some excellent software packages are available as free downloads and all the photographs in our previous article in Issue 26 were created using this technique.

Finally, taking photographs by pressing the shutter release button on a microscope-mounted camera can cause the set up to shake slightly, resulting in poor images. This can be overcome by using image capture software, whereby the camera is operated through a computer, or by using a hand-held shutter release cable attached to the camera. Useful tips for photographing amber inclusions without specialised equipment can be found in Crichton & Carrió (2007).
Advanced microscopy and imaging techniques
Amber inclusions can also be studied using transmission electron microscopy (TEM) and scanning electron microscopy (SEM). These techniques are restricted to universities and well-funded museums, and require considerable preparative skill. SEM looks at external surfaces, so the specimen must be broken. TEM can only be used on very thin preparations. Grimaldi et al (1994) described a novel technique for fracturing amber and extracting inclusions for electron microscopy.
They compared the preservation of insect inclusions in Dominican and Baltic ambers using both SEM and TEM. The former deposit was found to have a consistently higher degree of internal organ preservation. SEM in backscattered electron mode (SEM-BSE), low temperature SEM (LTSEM) and confocal laser scanning microscopy (CLSM) have been used in recent studies of Cretaceous amber microbiological inclusions. A particularly interesting study by Koller et al (2005) used a new technique for internal fixing of amber inclusions in association with TEM and histochemical staining.
More recently, high resolution X-ray computed tomography (HR-CT) has been applied to amber inclusions with startling results (Dierick et al, 2007). HR-CT images are calculated from a series of X-ray transmission images recorded at different angles and can produce micrometre-scale spatial resolution. It also provides a non-destructive, minimum preparation method for imaging minute morphological details including internal morphology and generates three-dimensional reconstructions that can be sectioned and viewed from multiple angles (Fig. 6). Essentially, it is possible to dissect an amber inclusion digitally. This is particularly useful in overcoming the problem of the white emulsion coating of inclusions commonly encountered in Baltic amber. Whether or not computed tomography has any detrimental effect on the amber itself is currently unknown.

Another way of achieving similar results is the application of propagation phase contrast X-ray synchrotron imaging (Soriano et al, 2010), followed by micro CT, which is particularly useful for screening of bulk samples of completely opaque amber for inclusions. The data can then be fed into a three-dimensional plastic printer to make a physical model of the inclusion (Fig. 7).
Both of these techniques use the same physical principles, so the differences lie mainly in the fine details (temporal/lateral source coherence, propagation distance, fringe sampling, and so on), which are rather difficult to convey and explain succinctly in layman’s terms. The main difference between lab-based and synchrotron-based phase contrast imaging lies in the intensity of the X-ray beam. An appropriate comparison might be between a pocket flashlight and a laser pointer – the former produces a dim cone of white light and the latter, a single-coloured bright beam. Therefore, synchrotrons can generally create a larger phase enhancement, since their X-ray brightness is not compromised by pushing the detector further back and consists of only one colour (wavelength) of light.

It should be noted that modern techniques are expensive and have not progressed to the point where they are a replacement for traditional ones. Indeed, they appear to be complimentary. When using any of the techniques discussed above, it is important to check the final image against the actual specimen for artefacts (or missing structures), to ensure faithful representation of the inclusion under study. A useful review of tomographic techniques for the study of exceptionally preserved fossils (although, it primarily considered non-amber specimens) is provided by Sutton (2008).
Despite the remarkable preservation of fossils in amber, many neontologists still tend to omit (or even worse ignore) them in their analyses of extant faunas, claiming that they are taxonomically subequal to living forms. However, new imaging methodologies demonstrate a high degree of phylogenetic inference from even very tiny amber inclusions.
This article has been modified from Penney & Green (2010).
About the authors
David Penney is a visiting scientist in the Faculty of Life Sciences (Preziosi Lab) at the University of Manchester, who specialises in research on amber palaeobiology and spiders. David Green is the mineralogy curator at Manchester Museum and has a keen interest in fossils in amber and photomicroscopy. The authors are currently working on several projects together.
Conservation and curation
Conservation of amber specimens is an issue of concern to private collectors and museum curators alike. Given the great antiquity of amber, one could be forgiven for expecting it to have achieved chemical stability and to be relatively inert. Unfortunately, this is not the case and amber specimens do tend to deteriorate over time. The major problem is oxidation of the amber surface, which manifests itself as darkening and the formation of a crust. As degradation progresses, the surface develops cracks and fragments, a process that can be accelerated if specimens are kept in inappropriate conditions.
Deterioration can be promoted by both high and low humidity levels, and different ambers darken and craze at different rates when exposed to fluctuations in temperature and humidity. Specimens are best kept in relatively constant anoxic conditions, although this is highly impractical for most collections. Keeping specimens in closed containers, protected from exposure to light and fluctuating humidity, lessens the rate of oxidation. However, the long-term consequences of enclosing specimens in transparent resin are unknown.
One problem with amber is that it is ‘moreish’. As a collection grows, it becomes increasingly difficult to keep track of individual specimens. Therefore, a recording system is vital. This should include details of what the specimen is, where it came from, how it was acquired and from whom. The simplest technique is to place a label in the box or bag with the specimen. However, since many specimens are small, it is easy to mix them up. This can be avoided by attaching a tiny label with a unique identification number to the specimen.
Another method is to place a small amount of Tipp-Ex (liquid paper) on an unimportant part of the specimen and then, once it has dried, write a reference number on it. Alternatively, a small flat surface can be ground onto the specimen and the number written in permanent marker pen. This is less obtrusive than the Tipp-Ex method, but the low contrast can make the number difficult to see (good from an aesthetic perspective). A reference number can even be scratched on the surface of the specimen with a pin, but this will disappear if the surface oxidizes. All of the above techniques have advantages and disadvantages and which one is chosen is a personal matter. However, the reference number must be present on the label and recorded in a central catalogue. Most modern catalogues use a computer database. This can include a digital photo of the specimen, the weight of the specimen and a list of the inclusions, preferably with linked photos.
References
Crichton, W.R.B. & Carrió, V. 2007. Photography of amber inclusions in the collections of National Museums Scotland. Scottish J. Geol., 43: 89–96.
Dierick, M., Cnudde, V., Masschaele, B., Vlassenbroeck, J., Van Hoorebeke, L. & Jacobs, P. 2007. Micro-CT of fossils preserved in amber. Nucl. Instr. and Meth. A, doi:10.1016/j.nima.2007.05.030.
Grimaldi, D.A., Bonwich, B., Delannoy, M. & Doberstein, S. 1994. Electron microscope studies of mummified tissues in amber fossils. Amer. Mus. Novitat., 3097: 1–31.
Haug, J.T., Haug, C., Maas, A., Fayers, S.R., Trewin, N.H. & Waloszek, D. 2009. Simple 3D images from fossil and Recent micromaterial using light microscopy. J. Microscop., 233: 93–101.
Hoffeins, H.W. 2001. On the preparation and conservation of amber inclusions in artificial resin. Polish J. Entomol., 70: 215–219.
Koller, B., Schmitt, J.M. & Tischendorf, G. 2005. Cellular fine structures and histochemical reactions in the tissue of a cypress twig preserved in Baltic amber. Proc. R. Soc. B, 272: 121–126.
Penney, D. & Green, D.I. 2010. Introduction, Preparation, Study & Conservation of Amber Inclusions. Pp 5–21 in Penney, D. (ed.). Biodiversity of fossils in amber from the major world deposits. Siri Scientific Press, Manchester, 304 pp. (available directly from the publisher via http://www.siriscientificpress.co.uk).
Soriano, C., Archer, M., Azar, D., Creaser, Ph., Delclòs, X., Godthelp, H., Hand, S., Jones, A., Nel, A., Néraudeau, D., Ortega-Blanco, J., Pérez de la Fuente, R., Perrichot, V., Saupe, E., Solórzano-Kraemer, M. & Tafforeau, P. 2010. Synchrotron x-ray imaging of inclusions in amber. C.R. Palevol, in press.
Sutton, M.D. 2008. Tomographic techniques for the study of exceptionally preserved fossils. Proc. R. Soc. B, 275: 1587–1593.